Touring Costs: The Bikes
There’s a lot said on the internet about the perfect touring bike and it can feel a bit overwhelming. On bike comparison websites, an ‘affordable’ set up can cost anywhere from £650 upwards and that’s without even considering kit. It can make a tour seem impossible – like you’ll never have that much money to spend, and if you do, like you’ll never know enough to make the *right* choice. It’s easy to project a lot of the anxiety about touring onto finding the perfect bike.

We wanted to break down the costs of our cycle tour, from bikes, to kit, to daily budget because we think that money is something often submerged in discussions about cycling, cycle touring and travelling. We also wanted to break down our bikes because they are often the first thing people ask about, and folks are often surprised when they see we are just riding ‘ordinary’ bikes.
Our bikes aren’t the cheapest and there are certain things we have prioritised money-wise. There are ways of getting bikes and kit for nearly nothing, but these usually take time, access to a vehicle, social capital and some/a lot of bicycle know-how. An interesting exercise in creating a really money-cheap set up is on tomsbiketrip.com. He puts together a touring bike and camping kit for around £25 (link here). Whilst it ignores all the things he has access to to do so, it is interesting in the way it challenges assumptions about how much certain things cost.
We’re not saying our touring set-up is the ideal one. But we wanted to write about what we prioritised and how that materialised and what that cost.
We wanted: Reliability, Fix-ability, Comfort, Re-Useability
What that means: We wanted bikes that would be able to carry a large amount of stuff and us, which we both knew how to fix and could easily source the means to do so, which were comfortable for long, slow days in the saddle, and which we either were riding before we left, or would ride when we got home.
What that looks like for us:
Steel Frames – although steel frames have been joined by aluminium and carbon, which potentially are less bone-shaky on cobbles, they are reliable and have a greater fix-ability factor – if carbon or aluminium cracks you’re toast, but steel can be bent, rebent, welded, reinforced and is a material used across the world, so if you’re travelling somewhere more remote, you’re less likely to be stranded. (Also, because steel is super strong, you can make bikes with really narrow tubes, which I find v.aesthetically pleasing (a fact which you can also use when you’re trying to figure out if a bike is steel-framed))
Strong Pannier Racks – at the end of the last tour Abi’s rear pannier rack was held together with duct tape and tyre levers functioning as splints. You’re loading your life onto the racks, and so we wanted them to be strong and capable of taking the load.
Rim Brakes – lots of people tour with disc brakes, especially on modern bikes. We chose rim brakes for 3 reasons: 1) I know how they work, and therefore how to fix them. I’ve never had a bike with disc brakes, so i’m far less confident. 2) The parts of rim brakes are easier to find, as they are more universal. 3) You need a bike built to use disc brakes – with wheels that have space for them etc – and we didn’t want to buy totally new bikes.
Butterfly Bars – this was to do with comfort more than anything else. on bikes you basically have a choice between two varieties of handlebars, some kind of straight handlebar (including the butterfly bars we have which are sort of curvy) and racing bars which are the ones that loop down. You have to choose because, essentially, the levers for brakes and gears are different on them (at least, on modern ones – i can’t see why you couldn’t mess around with this.) I prefer the more upright position you get with butterfly bars, especially on fast descents and off road riding, and the ability to change my hand position often.

Gears – we wanted them, basically. Coming from east anglia, our poor fen legs quake at the sight of hills. We weren’t about to summit the alps, but on a fully loaded touring bike, even the slightest incline can feel like a mountain. Choosing old mountain bikes meant we had each had a decent number of gears – 3 big chainrings at the front, plus cassettes with 7 gears meant we each have 21 to work through before we throw in the towel.
Second Hand Bikes – firstly this is a cost thing; second hand bikes are just cheaper. secondly this is to do with fix-ability – i have a lot of faith in older, steel framed mountain bikes from the 90s which were built to last. thirdly, this is to do with our environmental impact – neither of us wanted to buy a new bike when these ones have loads of life left in them, and are crying out to be ridden? finally, I grew up in Cambridge, where bike theft is endemic and having older, slightly battered bikes makes them less appealing to steal.
What we compromised on (and what you might want to prioritise): Speed, Lightness, Looks, Ease (in some ways – we had to work harder to find pannier racks compatible with Abi’s bike for example), any number of other things that might be important to you!
Lili’s Bike, Aggy

Bike: Second hand Giant Granite Mountain Bike, bought through gumtree (£50) in 2017.
Parts: I kept most of the original parts on this bike, including the seat which just by luck seems to really suit my body, the chainset, pedals, stem, wheels (which are 26” and therefore more universally repairable.)
Butterfly Handlebars (£16) Bar Tape (£5) Tyres (£60)
I swapped out the straight handlebars I’d been riding with for butterfly handlebars which offer more hand positions. I bought cheap but cool looking bar tape which is suffering after over 1000km of use. I switched the cheap mountain bike tyres I’d been riding around Edinburgh on for slicker puncture resistant touring tyres (and really noticed the difference on roads!)
Back Pannier Rack: Topeak Rear Pannier (£27) – This pannier rack was well reviewed.
Front Pannier Rack: Blackburn Outpost (£50) – We wanted a front pannier rack on at least one of the bikes which could accommodate a dry bag bungeed to the top to create more room (specifically for that day’s lunch and other mid-ride items). This was especially important because we don’t have handlebar bags. Since mine had the necessary holes in the front fork to fit racks that allowed this, I went for this one.

Servicing: A few months after I bought the bike I went into The Cycle Service in Edinburgh and asked them to change my brakes from Cantilever brakes to V brakes. I hated maintaining the cantilever brakes, and I was riding the bike a lot and I just wanted a brake system I felt comfortable with. This, plus a full service (and tightening the wheel hubs and new tyres), came to about £100.
I serviced the bike myself a few times at the Wee Spoke Hub on Guthrie Street for free.
Just before the tour, after I set up the bike with the new handlebars etc I took it into The Bike Smith opposite Haymarket. I just wanted someone to check over my work. This was not a pleasant experience, as a few hours after dropping it in I received a phone call from the owner which felt very bullying, where he listed a bunch of things I should replace for a cycle tour, told me if I spent enough money I’d have a bike that would take me round the world without any trouble and then told me my wheels were more for ‘monthly rides around the park’, which, before I told him about the tour, he clearly assumed on sight was the extent of my interest in cycling. I let him service it, replace the bottom bracket, kindly asked that he just leave everything else and picked up my bike the next day begrudgingly paying him £57. I felt terrible, and like I’d just wasted all this money, and it was not a good experience. When we regaled this story to a cycling friend in an Edinburgh pub they sagely nodded their head. We were too hurried and overloaded to stop to ask for advice and access the community knowledge around us and we paid the price!
About halfway through our ride in the UK, I took the bike into our old Local Bike Shop in Cambridge to ask Mark, our very trusted Local Bike Mechanic, to take a look at the rim on my rear wheel. As I suspected, a few years of riding plus all the relentless braking on the downhill had finally worn the rim down (the big disadvantage to having brakes that work by applying pressure to the metal rim of your wheel instead of the more modern disc brakes). He replaced the whole wheel with a decent double walled rim wheel.
Stickers: £1.50 from Decathlon. These vinyl eye stickers were crying out to me, I hoped I could summon Foucault and dissuade any potential bike thieves by reminding them I was watching, society was watching, but most importantly, they were watching themselves.
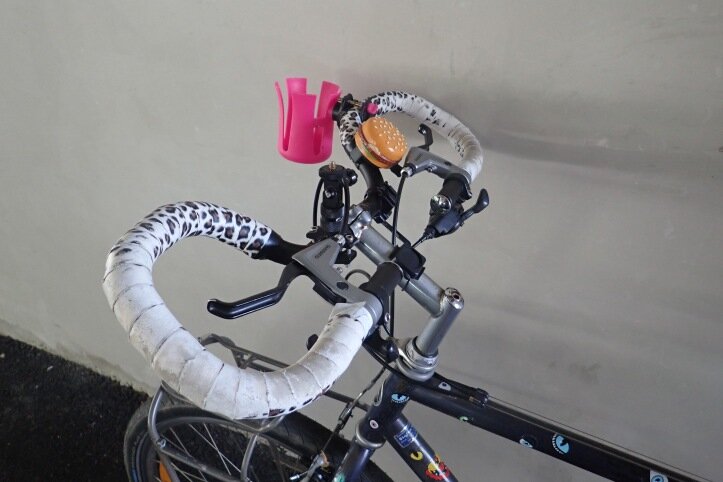
Bottle Cages: 2 basic bottle cages, both from Halfords. Gotta stay hydrated! As you can see in the picture, the older pink one has snapped from wear, but nothing a little duct tape won’t fix. £6
Bell: If you’re planning on doing a lot of cycle routes/shared use paths, please consider a bell. Its useful for warning other cyclists you’ll be overtaking. Its important for letting pedestrians know you’re coming up beside them (even if you have plenty of space). Its great for scaring off herons on your path or gleefully greeting other cyclists on the same route as you. Mine is shaped like a burger, because when i first got this bike I was working for deliveroo. £5
Cup Holder: This pink plastic cupholder was an impulse buy from Tiger Copenhagen and I love putting my (2nd) morning cup of coffee in it to have as a morale booster during our morning break. £2

Total: £440 (this is the total we’ve spent on the bike in three years of owning it, plus the cost of setting it up to tour)
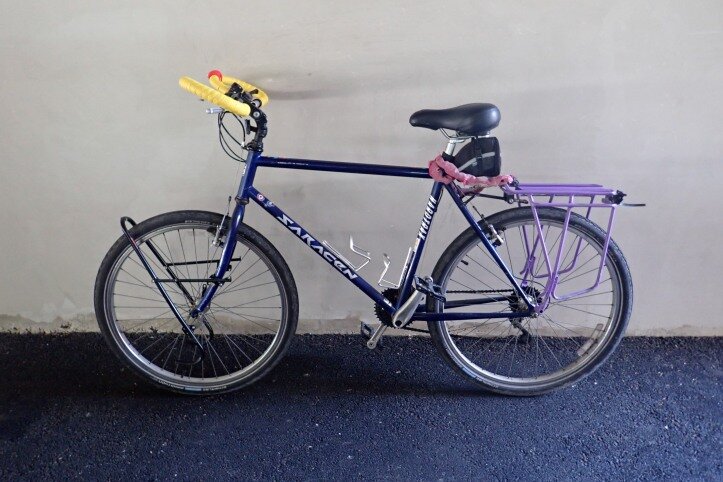
Abi’s Bike, Frankie/Belle
I originally planned to tour on my old steel framed Dawes called Patti. Unfortunately, Patti had other ideas and on the second day of our Kirkcaldy to Athens tour the bottom bracket went, the pedals seized and when we got her to Glasgow we realised she was officially un-fixable. She’d lasted the whole last tour, and we salvaged the frame and wheels and stored them in a friends cupboard to retrieve on our return.
Bike: Second hand 1995 Saracen Mountain Bike (Steel framed) bought from Bikes for Good, Glasgow : £175
Parts: Butterfly Handlebars, Saddle, Bar Tape, Pedals: Free (Taken from my old bike, Patti. In all these parts cost around £50 new). New (2nd hand) Stem: £5 (the stem on my new bike didn’t fit her handlebars). Schwalbe Marathon Tyres: £30 each.

Back Pannier Rack: Second Hand Topeak rear pannier (spray painted lilac). This was a stroke of luck and happened to be at Bikes for Good when we bought the bike (I was particularly happy with the purple colour). £10.

Front Pannier Rack: Tubus Tara Low Rider. Front racks were a pain to find because my bike lacked the holes needed for conventional racks. After searching online we decided to go for a set up that many other people recommended. This rack (£80), plus adapters for the fork (£12) and a selection of adaptors (£10) plus some different sized bolts and screws begged from a construction wholesaler down the road from us in Hamilton created a strong-enough front rack system.
We realised that we could have used the price match on Evans Cycles and got the rack for a lot cheaper (this is always worth checking out!). We used Evans because it was easy to collect the parts from our nearest store whilst we have no fixed address.
Pedals: In Reading, one of my plastic pedals full on cracked! A combination of the demands of lots of ascents plus the fact we didn’t tighten it as well as we should have. We replaced them with some hardwearing mountain bike pedals – a larger, stable surface with small metal grips. £15
Bell and Bottle Holders: See Above.

Servicing: Free. We put together the bike in the DIY Bike room at Bikes for Good, Glasgow, with the help of volunteers and mechanics who checked it was rideable before we left. It was a brilliant experience, as we essentially stripped Patti down to the frame and then built up the parts of Frankie/Belle that I wanted to change. It allowed me to get to know my new bike, and I got to do a bunch of things I’d never done before, like remove a bottom bracket.
Total: £370
Its worth noting that a lot of this was made possible by Lili taking a Velotech Gold course way back in 2017. This lasted a week, taught them how to strip and rebuild all the basic systems on a bike and cost £400. It really built their confidence to go into bike spaces and continue this learning. If you’re lucky enough to be able to access somewhere like Bikes for Good, LBK, or a DIY bike space or bike kitchen its worth checking out their maintenance classes or taking your bike in to ask questions.
We expect these bikes to inevitably have some problems on tour, but we’re confident that we know them well enough to anticipate/notice them/fix them/articulate what’s wrong to one of the many helpful people we’ll meet. One of our greatest sources of bike knowledge on the last tour wasn’t bike shops, but the people we met through warmshowers, so don’t be afraid to reach out for help.
We also know the importance of basic cleaning and maintenance to avoid problems – we regularly (one a week if it’s very grubby riding, once every couple of weeks if its mostly clear road riding) clean our chains, cassette and chainrings (the bits that make up the gears) with rags n washing up liquid, and re-lube them, wipe down our rims with a clean sponge (to minimise wear to both the brake pads and the rims), brush off dust/dirt from our hubs, or if we’re lucky, use one of the amazing pressure washers on the loire route!

We make sure our brakes are working, our tyres are pumped up and nothing is wobbling where it shouldn’t (both pannier racks, and the moving parts of our bikes like our headsets, wheel hubs and bottom brackets)!
Again, learning some bike mechanics (one way or the other) was essential in giving us the confidence to make these assessments.
These bikes will continue to be our day to day bikes when we get home: the great thing about a touring bike is that it’s already primed to be loaded up with groceries!